Sunday, 19 May 2013

Turnip the Vegimal


My niece Sydney was turning 2 and loved the Octonauts! I decided to make her a fun under the sea cake. I made of a very rough draft of how I wanted the cake to look. I think the Octonauts are just the cutest and I was excited to make them.
 
I made Turnip the Vegimal out of Satin Ice pure gum paste. I modelled the figurine with my fingers and stuck all his appendages on with water and small paint brush. I let him dry over night so he would hold his shape on the cake.
 
 Here, using gum paste I made a bunch of different types of decorations. Using a 5 stem flower cutter I made star fish, I rolled the gum paste out quite thick so that the star fish would look more realistic. I then added little indents to the star fish using a little pin to give it some character. I also made mini oysters and put a tiny pearl dragee inside of it. I made mini coral pieces in pink, and purple. To make the ruffled effect, I pinched the bottom of a small piece of gum paste.
And of course last but not least I made Captain Barnicle Bear and Kwazii Cat.
 
My favourite one of them all to make was Professor Inkling Octopus.


 I added a light crumb coat to both cake tiers. I put them in the fridge for about 3 hours to make sure the butter had harden and the cakes would be easy to work it. Once they were ready I stuck the 8" tier to the cake board with frosting. Then I added dowels to the 8" cake so that it would support the weight of the 6" cake. After the cakes were secured and stacked, I tinted the vanilla frosting blue and made sure that I didn't completely mix the color. I wanted it to look like waves with some parts being lighter and darker than others.
 
 
 Using my offset spatula and my mini palette knife I created the wave look on the cake.
 
 
Once that was complete and the frosting was still at room temperature I added all of the decorations I made earlier to the cake. On the cake board I added brown sugar to give it a sandy look. The decorations stuck nicely to cake without any sort of glue. I tried to make the cake look full of aquatic life with a bustling under the sea feel.


 Over all I was very pleased with this cake. And Sydney just loved it!


After my niece's birthday party was over, I found an Octonauts massacre! Sad but true, at least these little guys made a lot of children very happy. They lived their life with purpose.


Saturday, 11 May 2013

Moroccan Lambeth Style

A very good Chef friend of mine was having a destination wedding and unfortunately I wasn't able to attend. So he asked me if I could make a cake for their wedding shower. I gladly accepted! The theme was a Moroccan Garden Party. They wanted bright colors and lots of gold, which is right up my alley!
 
 
 Only 2 tiers were real and the others were Styrofoam dummies that I covered with fondant. I made a batch of Royal Icing and had my trusted piping bag ready. I used various styles and numbers of tips to create the beautiful piping. I started on the bottom tier and didn't have a plan of how I wanted this cake to look but I winged the whole thing and was pleasantly surprised in the end.
 
 This piping style is called the Lambeth Method, it's definitely my favorite look on cakes, it is very difficult to master and it takes a lot of practice. You need to have a lot of control with your piping bag and don't ever hesitate when piping. If you hesitate it will show with your design. You want to keep a soft fluid motion with a quick release at all times. And always a steady hand!
 The beautiful thing about the Lambeth Method is that it looks so elegant, there is a constant overlay which adds a beautiful dramatic effect to cakes. Which makes it seem that the piping is jumping off the cake.  
 I used 24 carat gold dust to paint over the piping. Which gave the cake a very regal look.


Over all I was very impressed with the way this cake turned out and of course my friends we're ecstatic with the finished product!


Friday, 10 May 2013

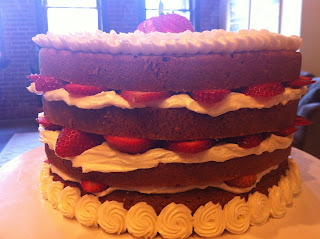
Strawberry Shortcake

 
Strawberry shortcakes are one of my favorite cakes to make. They look pleasing visually and taste delicious! Strawberry shortcakes also remind me of spring, when all the berries are ripe and in season. These cakes have a definite WOW factor to them, yet they are easy peasy to make!
 I made an easy vanilla bean cake recipe and substituted butter for oil, so that the cake would be more moist and less dense. I mixed the oil, sugar and eggs first for a long time on a medium speed until the 3 were incorporated and became into a thick jelly looking paste.  Then I added the vanilla and vanilla bean paste. Lastly the flours and leveners.
There are many things in the baking world where you can cut costs(for example on dry goods) but one I will never cheap out on is the Vanilla. You can smell and taste the difference with ARTIFICAL vanilla compared to PURE vanilla. I love adding a fresh vanilla bean or vanilla paste to my batters and icings. Those little black specks make me feel as though I'm eating a high quality product. Because let's face it...vanilla beans aint cheap! 
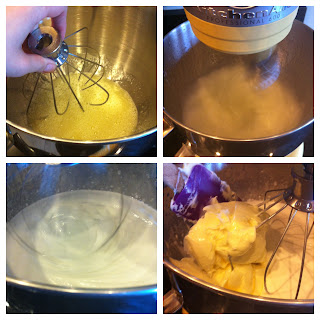
 I made a Swiss Meringue Buttercream, this is the real deal. People and bakeries everywhere always call Frostings "Buttercream". When it fact it is not a "Buttercream". A buttercream will always have EGGS in it, that will be heated and whipped into a meringue and with added softened butter. A frosting does not have eggs, the main ingredients are usually butter and icing sugar. Sometimes people cheapen out on butter and use shortening instead. Which all I have to say is YUCK! You can always taste the difference between butter and shortening. Shortening leaves a nasty waxy taste in your mouth.
I baked the cake at 350F, for about an hour. I let the cake cool for a bit the I flipped it out and sliced the layers.
Here, I added simple syrup to the cake, then added the buttercream and fresh sliced strawberries. The look of your cake is just as important as the taste. Don't ever hold back on decoration or flavor. The smallest touch makes the biggest impression.
 I decided to use a small rose tip on my piping bag to create the frills on the top of the cake. And a small star tip for the rosettes on the bottom.


 I love the way this cake turned out, unfortunately I didn't get to eat any of it. But the good news is I had cake scraps left over from the top. So I made myself a ghetto little piece of cake scrap strawberry shortcake. And that was divine!


Thursday, 9 May 2013

Pink Birthday

 I love making pink birthday cakes. It seems to be a huge fad for little girls, so I find myself more often than not making them. In this case, less is more. I did a simple cake mask on the outside and garnished the cake with some pretty rosettes and a few little non-pariels.
 I am very lucky that I have 4 adorable little nieces and every year I ask them what kind of birthday cake they want me to make them. This year Sophie asked for a pink Dora cake. So of course I gave her what she wanted.
I made Dora completely out of gum paste and I free handed the whole thing. I colored her eyes with edible marker (I highly recommend using edible marker). I used an exacto knife to make crisp cuts for her shape and glued all the pieces together with water and a paint brush and  I used white dragee's for her bracelet.
No matter how busy life gets, I will always make time for cake if it brings this reaction! It makes everything totally worth it.

Elmo's confetti cake

 I don't generally enjoy making tall cakes with fresh fruit on the inside, but my friend's daughter Chole requested it, and the birthday girl always gets what she want. These tall layered cakes love to wobble around while you're trying to crumb coat them and also when you mask them. Sometimes it makes the cake look like the Great Tower of Piazza. But since I'm a pro I was up for the challenge! If you know me well, you know that I love things that are tall and slender and that's why I love the way a tall cake looks! There's something special about it.

I made vanilla frosting and added seedless raspberry jam instead of puree (because lets be honest, jam is a lot easier to find the grocery store). It flavored the frosting nicely and I added fresh raspberries to enhance the texture and flavor.
 As you can see, I'm kind of obsessed with sprinkles, I love the way they jazz up children's birthday cakes. If you're going to try this trick, please be advise that the stick sprinkles are easier to use than Non-pariels (the little sprinkle balls). Regardless sprinkles will get everywhere so I recommend using a plastic bag underneath your area while applying them.
 To make a mini Elmo, I used gum paste. My favorite gum paste to use is Satin Ice. The texture is smooth and not as sticky as the Wilton brand. It also hardens much faster. I used a ton of red paste food coloring to achieve Elmo's color of red. Then I manipulated Elmo's shape, making the body first, then the head, then the rest of him. I stuck his body parts on with water. Remember sugar always sticks to sugar.

 I decorated the cake with mini gumballs and giant gumballs, and I added pink royal icing to the cake board because it's Chole's favorite color.